White balance explained: how cameras correct the color of different types of light
The colour of the light will affect the colours in your photographs. You probably won’t notice this with the naked eye because our minds adapt very quickly to perceive the colour of the light as neutral, even when it’s not.
The camera is less forgiving, and records colours exactly as they are. That’s why pictures taken under household lighting have an orange colour cast, and pictures taken at dusk or dawn have a cold, blue look.
Digital cameras have ‘White Balance’ controls to correct these colour shifts. This adjustment happens when the camera processes and saves your pictures.
For example, if you take a picture under incandescent lighting, the camera can reduce the amount of orange in the colours and boost the blue to produce more neutral colours.
Auto or presets?
You can leave the camera to work out the White Balance automatically. Auto White Balance systems in cameras are constantly being improved, and the results you get now are certainly much better they were in the early days.
You can leave the camera to work out the White Balance automatically. Auto White Balance systems in cameras are constantly being improved, and the results you get now are certainly much better they were in the early days.
Even so, they’re not foolproof. Auto White Balance may fail to correct certain kinds of lighting strongly enough.
This often happens with artificial lighting, which may still produce a warm colour cast even with auto White Balance switched on.
You may find that the auto White Balance corrects colour casts when you don’t want it to. This can happen with sunsets or landscapes, where the colour of the light is an integral part of the picture.
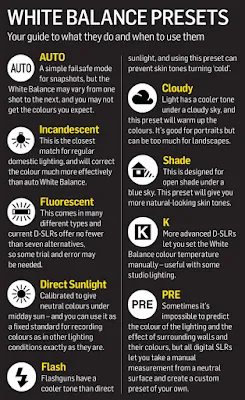
This is why most DSLRs come with White Balance ‘presets’. These are tuned to provide a fixed correction for common lighting scenarios. The camera relies on you to choose the right setting for the scene.
This involves more effort than using the auto White Balance option, but it puts you back in control and does give better results.
Raw power
The alternative is to shoot raw files rather than JPEGs. With JPEGs, the camera will discard ‘unwanted’ colour data according to your White Balance setting. You can’t get it back, even if you realise you’ve made a mistake.
The alternative is to shoot raw files rather than JPEGs. With JPEGs, the camera will discard ‘unwanted’ colour data according to your White Balance setting. You can’t get it back, even if you realise you’ve made a mistake.
Raw files, however, retain all the colour data captured by the sensor. The camera will embed your White Balance setting in the file as a default, but it’s purely advisory – you can choose a different setting on your computer later.
It’s still useful to set the White Balance on the camera. It will save time later if your RAW files have the best White Balance setting applied, and by choosing a consistent White Balance during your shoot, you ensure that the colour rendition will be consistent across all your shots.
While it’s tempting to leave your camera set to auto White Balance and trust it to get the right colours, you’ll get better, more consistent results if you take control of the White Balance yourself.
Tint vs Temperature
White Balance settings are worked out according to colour temperature settings, which go from amber through white to blue, but there is a secondary ‘tint’ adjustment that adds a green-magenta shift.
White Balance settings are worked out according to colour temperature settings, which go from amber through white to blue, but there is a secondary ‘tint’ adjustment that adds a green-magenta shift.
This can be used for manual White Balance fine-tuning on the camera. Raw converters like Adobe Camera Raw use Tint alongside Temperature as an integral part of White Balance adjustments.


.jpeg)
0 Comments