n the digital age you as a photographer are expected to be familiar and knowledgeable with Photoshop. It can be argued back and forth if this is right or wrong and whether Photoshop is ruining photography. But I see Photoshop as a tool, just as the darkroom was a tool to manipulate images. I have put together this list of 10 techniques that helps me get the most out of my images.
As my photographic skills grew so did my curiosity for better images. The more I observed the photographers I looked up to, the more I noticed the images they took were not straight from the camera. Post processing plays a big role in today's photographic society. Whether it's used subtlety, or for major composites, it's definitely an important skill to know. Over the last few years, through experimentation and taking bits and pieces of what other photographers have shown me, I built a workflow that I use for my post processing. This list is an overview of how I edit my photos. There are thousands of post processing methods; this is just what I have developed and what has worked for me. This is not a beginners guide to Photoshop. This list is in order of my workflow.
Please share any images with a description of the techniques you learned from this article in the comments. I'd love to see your work and what you've learned.
As my photographic skills grew so did my curiosity for better images. The more I observed the photographers I looked up to, the more I noticed the images they took were not straight from the camera. Post processing plays a big role in today's photographic society. Whether it's used subtlety, or for major composites, it's definitely an important skill to know. Over the last few years, through experimentation and taking bits and pieces of what other photographers have shown me, I built a workflow that I use for my post processing. This list is an overview of how I edit my photos. There are thousands of post processing methods; this is just what I have developed and what has worked for me. This is not a beginners guide to Photoshop. This list is in order of my workflow.
1. Flattening out the Image in Raw
This is the foundation for my editing. You can't build a house without a solid foundation; well you can't edit a photo without one either. It is in Camera Raw where I set up my image to be edited in Photoshop. The first thing I do when I open my images in Camera Raw is adjust color temperature or exposure if I need to. I will then set the highlights slider between -30 to -80. I then set the shadows slider between +30 to +80. I want my highlights to be a little dull and shadows to be very flat and almost in the same tonal range as my midtones. This flattens out the image quite a bit (the image will look pretty boring and ugly). I want the image to be really flat when going into Photoshop. I flatten the image out because when I open it into Photoshop, all of the toning and techniques I use will give it the right amount of contrast I need. If the image has a lot of natural contrast going into Photoshop my techniques will ruin the image and give it way too much contrast.
(images exported from camera raw with my adjustments)
2. Using the Healing Brush
I like the healing brush rather than the spot healing brush because I like to pick my own source points. I will use the healing brush to remove any pimples, inconsistencies on the skin, or any distractions on the background. I use this on landscapes or sports shots as well. I go through and get rid of any small distractions with this. It's amazing what a difference this can make when getting rid of distractions on backgrounds. Attention to detail is important here.
3. Using the Clone Stamp Set to Lighten or Darken
I frequently will use the clone stamp set to lighten. I will use this on backgrounds and sometimes even skin. Now before everyone goes crazy, I use it at around 15% opacity. I use it on areas that already don't have much detail. I also usually only use this with natural light shots since they tend to not have much detail. I will only do this when I don't find it worth the time to use frequency separation. It can be very helpful to blend transitions in the sky or on patterns that don't have a lot of detail.
4. Learning How to Dodge and Burn
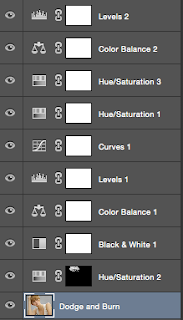
I love dodging and burning. I love shaping the light a little more to my liking. There are many ways to dodge and burn. To be the least destructive, I will use one curve adjustment layer set to a brighter exposure and one set to a darker exposure. Then using the layer mask and brushes I will dodge and burn where I see fit. Sometimes I will also use the actual dodge and burn tools in Photoshop. I like these because I can set them to affect the shadows, midtones, or highlights. When dodging and burning there are several things I like to keep in mind. I try to make my subject pop, I try to even out skin tones or other parts of the image, and I often will darken or lighten one side of the image. I try to create a sense of depth by having a transition from dark to light in some of my images. I also dodge my shadows a bit in preparation for the contrast that I will add later.
(Image after dodging and burning)
5. Frequency Separation
This is a great technique that is used for smoothing out skin. This is something to use sparingly and in moderation. I have also been using frequency separation on clothes, skies, backdrops, or anywhere I need to even something out.
(Images after frequency separation)
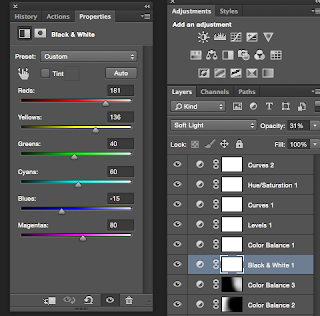
6. Black and White Layer Changed to Soft Light
This is my favorite post processing trick. It's an awesome technique a friend showed me that I have been using on almost all my images. I open a B&W layer, and then I change the blending mode to soft light. Now the image will probably look like it has too much contrast. This is why I'll drag the opacity to around 20-60%. I love the sharp commercial look this effect does to my images. I also love this because I can now control the luminance of each color with the sliders on the black and white layer. By adjusting the reds and yellows you can get some really beautiful skin tones.
7. Toning Using the Color Balance, Levels, and Hue/Sat Adjustment Layers
After my B&W adjustment layer I use these three adjustment layers to tone my images. I have them set in a specific order to get the look I want. I will have the Color Balance adjustment layer open first. Generally I will add some blues, cyans, or magentas to the shadows, reds, greens, or yellows to the midtones, and red or yellows to the highlights. This will usually keep colors more realistic. But this is where you can experiment and get some really cool looks. I will then add a Levels adjustment layer. With this I will add blues and greens on top of my shadows using the output sliders. Since the levels is on top it fills in the shadows with the colors and almost gives the shadows a film look. I will then use the Hue/Sat to fine tune my colors. I will adjust the hue, saturation, and lightness of each color. This is where I have the most fun with editing. I love experimenting with different tones to get different looks.
8. Crushing Highlights with Curves
I will add some contrast with a curves adjustment layer. I usually just have a small S curve with several points. I personally like crushing my highlights. This is when you bring the top point on the right side down a little bit, and then add a second point near it reducing the highlights' tonal range. Now this will give the image some weird color shifts sometimes, I don't do this to every image. I often will do it to more high key images.
(Example of where I crushed my highlights)
9. Using Layer Masks
I can't stress enough how important it is to learn layer masks. When I am toning or editing the image I don't want the effects to always be global. I often will tone, dodge and burn, or edit different parts of the image using layer masks. For example I always am using layer masks with the Hue/Sat adjustment layer. I do this because usually hands, ears, legs, etc. are often different colors. I will change the Hue/Sat of a color on a certain body part, and then mask out where I want it to affect. I will also tone the background differently than the subject sometimes. Remember: white reveals, black conceals.
10. Using Different Blending Modes
This is an area that is commonly overlooked. Besides changing the B&W layer to a soft light blending mode, I will sometimes change my curves layer to luminosity. By doing this you affect just the contrast of the image instead of affecting the contrast and saturation when it is set to normal. I also will open a blank layer, set the blending mode to color, use a brush at a very low opacity (5-15%) and even out colors of skin or clothes by sampling a color I like and painting over a color I don't like. There are 26 different blending modes. Try them out, experiment, and get creative.
(Final image after toning- Flare was added with a white soft brush on a blank layer)
(Final image after toning)
(Example of final edit)
(Befores and afters using my techniques)
Remember: use these techniques with care. I am always adjusting the opacity to my adjustment layers. All images shown were shot with natural light only.
Please share any images with a description of the techniques you learned from this article in the comments. I'd love to see your work and what you've learned.


0 Comments